
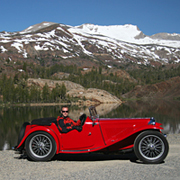
such a wonderful day after 2 years of corona restriction.
the MG club organised a visit to a great event at Schloss Lembeck.
there our cars were part of the programme
it was my first time to travel with this group of classic car friends
i hope not the last time
100 km on the road with my red friend, i love it , my wife love it and Emma our dog too
MG TA1932 in Germany - Blog - all problems and ...
-
Franz Tenbrock

- Posts: 576
- Joined: Wed Jul 11, 2018 9:39 am
- Location: Waltrop Germany
-
Franz Tenbrock
- Posts: 576
- Joined: Wed Jul 11, 2018 9:39 am
- Location: Waltrop Germany
Re: MG TA1932 in Germany - Blog - all problems and ...
got the new Blockley tires from England on monday, now they are on the wheels
just took them out for the first turn
much better then the old hard tires i had on the car
also i got a new used anycubic photon mono x printer from the bay,
i hope it will work fine and i can print some bigger parts
just took them out for the first turn
much better then the old hard tires i had on the car
also i got a new used anycubic photon mono x printer from the bay,
i hope it will work fine and i can print some bigger parts
- Attachments
-
-
Franz Tenbrock
- Posts: 576
- Joined: Wed Jul 11, 2018 9:39 am
- Location: Waltrop Germany
Re: MG TA1932 in Germany - Blog - all problems and ...
this summer i had so much work in my garden, so the cars stand still the most time
but yesterday it was a wonderful day
yesterday my family starts in the Bork Classic car rally
sister with volvo 2. place group 3
me with the TA 1. place in group 2
the husband of my sister has the YA and was 2. place in group 2, driven it 10 Minutes before he starts ;-)
my son with the V6 3.0L Spartan 2. place group 5
the ya drives so smooth, it's wonderful to drive it, 140 km without problems
my son forgot to refuel and 1 km after the start in the morning he stops on the road, his father has something on his back, so we could reach the next gas station
Bork is 12 km from home so very close and we could test the cars before the rally starts.
My wife got Corona a few days before, so we had to change teams the night before.
Some of the participants had Corona a few weeks before so they are safe, others, like me, don't have it.
We start at 10:00 in the morning and finish at 15:00, so a long time to enjoy the cars.
and the result was fantastic
all cars reached the finish without any problems
and all of us had a perfect result
this days are the days you know why you have such old cars
they are different
you feel the nature while you are driving in a total different way
the new blockleys are perfect for me, the car goes straight on the the grip is much better then the old tires
soem small work on all of my cars had to be done, but nothing difficult for me
some pictures for you
so you know i am still here
- Attachments
-
-
-
Franz Tenbrock
- Posts: 576
- Joined: Wed Jul 11, 2018 9:39 am
- Location: Waltrop Germany
Re: MG TA1932 in Germany - Blog - all problems and ...
after installing the alternator last winter, the tachometer works, but sometimes it jumps a bit
then at some point it doesn't work anymore,
i thought it was the cable to the meter
today sometime, corona knock out
took the meter off and opened it
that's what I saw in the picture
why?
What can cause something like this?
when the display no longer works above 3500 rpm
i can t let the fingers off
;-)
so i took my tools to dismantel the gauge
step by step i understood how it works
i got the spring off
and bend it step by step to the form it should be
the picture from the spring is after bending it some times, so it is better then it was
not absolutley like new but i think it should work like it is now
also i seem to understand how the gauge will be adjust, the sping must be in the correct position on the needle
i made a mark before i took it off
somewhere i had read that i can use my lathe to calibrate it
perhaps some pictures later so it is a documentation how you can reare it
and also i found a part that i could buy
https://www.ebay.co.uk/itm/394204857747 ... SwFr1ij7qJ
should be the correct one ??
have tested the meter in the car and it works, don't know exactly how at the moment but the needles go up and down when the engine is turning
i wanted to add a ford clock like declan did, found the tip a few years ago and bought a clock 3 years ago
a good job for corona fever
a difficult step was to cut off 5 mm from the hour hand drive, i did that with my dremel and it worked without damaging the minute shaft
in the back of the watch i secured the wires with some glue and plastic
after this i fixed the watch with two srews
difficult was to find the right position, but done it
next step i have to print the hands this afternoon,
for this I have to prepare my Photon mono x, put in new foil and adjust it.
after some trouble with my photon printer, i done it
some new pointers from it for the clock
in the moment i test it on the battery
it works as it should
THX to Declan for some tips
i have corona in the moment so i can t test it on the road
perhaps ii will order a new spring...
- Attachments
-
-
-
- Feder gebogen.jpg (33.69 KiB) Viewed 5963 times
-
Re: MG TA1932 in Germany - Blog - all problems and ...
Well done Franz. That`s what makes are "old" cars so great. With a little patience and thought most problems can be solved. Not like a modern car where just trying to get your hands around the engine is nearly impossible and as to sorting the electronics well for me it`s not even considered.
-
Franz Tenbrock
- Posts: 576
- Joined: Wed Jul 11, 2018 9:39 am
- Location: Waltrop Germany
Re: MG TA1932 in Germany - Blog - all problems and ...
the clock still needs some work, work in winter
sunny today
andfrom day tod ay more
today "Day of Unity" here in Germany
so we don't have to work
a british picnic for british cars on castle Bladenhorst
here are some pictures
my wife loves ya, so we were there with two cars ;-)
the TA loves this weather, not too warm, runs perfect, but in the end
no gas 500 m from home
the position of the fuel tap was wrong, so the tank was really empty
i still had some fuel in the back, but the hose to fill it was missing
i love this old cars
from day tod ay more
forgot the pictures
- Attachments
-
-
-
-
-
Franz Tenbrock
- Posts: 576
- Joined: Wed Jul 11, 2018 9:39 am
- Location: Waltrop Germany
Re: MG TA1932 in Germany - Blog - all problems and ...
Hello
today i use my knowledge to help a MG TC friend of mine
his shocks need new seals
so we use my 12 ton press
I have done this before so it was really easy, 6 tons and they came out
now he cleans them and comes back to put them back together again
I myself have a big job at home
we got a new gas heater in 2020 before Putin started this cruel nonsense
now gas is 4 times more expensive here so I bought a modern heat pump to get warm through the winter,
i have more than enough wood from our garden for the stove but from an environmental point of view the heat pump is better for sure
since the professionals have made some mistakes in my old system I do it myself now just
here times old and new
although some pipes more, but in my opinion neater
have to make the electrik next days after work, a friend will help me.
- Attachments
-
-
-
Franz Tenbrock
- Posts: 576
- Joined: Wed Jul 11, 2018 9:39 am
- Location: Waltrop Germany
Re: MG TA1932 in Germany - Blog - all problems and ...
Hello
the heating pump is running fine.
now new task on my TA
i want to renew all hoses and rubber parts on my TA
i had a problem last year, this should not happen again
have exchanged my lift with a friend
my old lift had a hydraulic cylinder in the middle, so you can not work there
now everything is free in the middle
I can not stand under it, but I can sit on the floor
and it is warm in my basement, outside it is cold
i will take a chair on some wheels
that will work
the lift is too big so i had to make some changes as you can see in my pictures
I hope I can finish the work this winter,
no problems I have not thought of
- Attachments
-
-
-
-
Franz Tenbrock
- Posts: 576
- Joined: Wed Jul 11, 2018 9:39 am
- Location: Waltrop Germany
Re: MG TA1932 in Germany - Blog - all problems and ...
i orderd all the parts some month ago
i hope i had all parts together
i hope i had all parts together
- Attachments
-
-
-
-
Franz Tenbrock
- Posts: 576
- Joined: Wed Jul 11, 2018 9:39 am
- Location: Waltrop Germany
Re: MG TA1932 in Germany - Blog - all problems and ...
i took off all wheels without problems
then all break drums, in the front a little problem for a few seconds
now all brake drums off
first step done
here some pictures
in the back on the left side some oil? inside, there i have to look what it is
next step:
i have to take off all parts inside
done
and I am sure that the problem at the rear left is from the brake fluid
the color of the rear plate is dissolved
all cleaned now for the next step
- Attachments
-
-
-
-
-
Steve Simmons
- Site Admin
- Posts: 2750
- Joined: Wed Dec 26, 2012 10:48 am
- Location: Southern California
- Contact:
Re: MG TA1932 in Germany - Blog - all problems and ...
The most common fluid in the rear brakes is gear oil. Might want to check for that also.
-
Franz Tenbrock
- Posts: 576
- Joined: Wed Jul 11, 2018 9:39 am
- Location: Waltrop Germany
Re: MG TA1932 in Germany - Blog - all problems and ...
most ....
we will see
I have this for Christmas
both cars
WORKS OF ART AS THEY ARE NOW
wonderful ;-
we will see
I have this for Christmas
both cars
WORKS OF ART AS THEY ARE NOW
wonderful ;-
- Attachments
-
-
Franz Tenbrock
- Posts: 576
- Joined: Wed Jul 11, 2018 9:39 am
- Location: Waltrop Germany
Re: MG TA1932 in Germany - Blog - all problems and ...
I need some fresh air in my underground garage to get a clear head
here the advantages of my new lift become clear
first i loosened the brake hose a bit ( 1 )
then i opend the next nut ( 2 )
then 3
at last i loosened the brake hose at the brake plate
after this stepse i took away the break bleader
and all other parts holding the break cylinder
taken me 60 minutes to take off all 4 break cylinder without any problems.
some pictures of the brake line routing in the back
difficult to find picutres with google, how it should be.
you see as it is in the moment, but perhaps it is better to turn around the clip in position 1 so that the routing ist on the yellow line , it is far away from the damper
also right side in the back
where can i find some pictures how it should be
happy for the moment, always a surprise to loosen old screws
now all lines are loosened
not taken off in the moment,
there are 2 Junctions not loosened, i will make it in a vive outside
also the braken master cylinder is inside the car
will take it off tomorrow
more done today as i thought
- Attachments
-
-
-
-
-
Franz Tenbrock
- Posts: 576
- Joined: Wed Jul 11, 2018 9:39 am
- Location: Waltrop Germany
Re: MG TA1932 in Germany - Blog - all problems and ...
now all brake parts off the car
the two junctions i can t loosen before under the car , it was easy in the vice, so it was a good idea to make it later
the brake master cylindr looks nearly new
so what to do now
dismantel it to change the rubber ?
as you see the rubber looks really good
only one part is damage, i don t know how to get it out like this
let it all as it is?
the brake works perfect before,i change the lines because the junction isn t double folded
last year one of this junctions break so i decided to make all new
what do you think
next days i will clean the frame, take some new paint for parts aren t good today
so some days to think about it
- Attachments
-
-
-
-
Franz Tenbrock
- Posts: 576
- Joined: Wed Jul 11, 2018 9:39 am
- Location: Waltrop Germany
Re: MG TA1932 in Germany - Blog - all problems and ...
must clean the chassis as best as possible and paint it with Brantho Corux
the brake fluid has damaged the paint in some places
I got a rebuilt steering 2 years ago, smooth no play
now it is the best time to install it
loosened all screws under the car
took off the steering arm
there is a screw that fixes the steering to the chassis
on the outside there was also a thin nut, is this original?
there is a thread in the bracket outside
so why a nut there too?
now I have a problem
The screw seems to be 2 or 3 mm too long, so I can not get the steering out of the bracket.
I measured before, only 2 or 3 mm.
What can I do now?
in the front is the engine mount,
take off the original screws and put in some thin screws so i can push the motor a little to the left?
will see it tomorrow, i have some holiday now
found this in the web now
https://aanddnotes.github.io/TC4985/odd ... dEnds.html
is this the correct routing in the back
i thought the clampsgoes outisde, here it is
- Attachments
-
-
-
cdrolshagen
- Posts: 113
- Joined: Tue Dec 29, 2015 1:30 am
- Location: Soerup Germany
Re: MG TA1932 in Germany - Blog - all problems and ...
Hi Franz,
the routing of the brake pipes at the axel casing shown on your attachment is correct,
not the routing on your car.
Remove the circlip - yellow arrows- from the brake master cylinder,
and remove the big nut on the other side,
than can you push out the operating piston,
and remember the order how the parts came out,
cheers Carl
-
Steve Simmons
- Site Admin
- Posts: 2750
- Joined: Wed Dec 26, 2012 10:48 am
- Location: Southern California
- Contact:
Re: MG TA1932 in Germany - Blog - all problems and ...
With the clip out, all of the internal parts will come out of the master cylinder. If the rear extension doesn't leak then I would leave it alone. There is no reason to remove it unless there's a leak. I also recommend replacing the mounting nut with an extended nut. It makes installing and removing MUCH easier! With the stock nut it's very difficult to get a spanner in there.
On the steering, maybe you can see how much thread there is sticking out the back side. If there's extra maybe trimming it would allow the bolt to be removed? I can't remember the last time I had to remove a steering box with the engine in place so maybe someone else can comment on whether this is normal.
On the steering, maybe you can see how much thread there is sticking out the back side. If there's extra maybe trimming it would allow the bolt to be removed? I can't remember the last time I had to remove a steering box with the engine in place so maybe someone else can comment on whether this is normal.
-
Franz Tenbrock
- Posts: 576
- Joined: Wed Jul 11, 2018 9:39 am
- Location: Waltrop Germany
Re: MG TA1932 in Germany - Blog - all problems and ...
ok
the screw is out, was about 2 mm too long
loosened the engine mount and pushed the engine to the left side a little bit
when i got the car, the engine mount on both side was bad damaged, perhaps this was the reason
the engine wasn t in place as now
@Carl
not so easy to get the damaged circlip out, it is broken at the end, yellow arrows ;-)
perhaps i can work on it with a dremel in the middle an break it out
but as steve wrote, no leak, no work ?!
all rubber parts looks new, so perhaps the last owner has done the job
the master cylinger looks really good as you see
tomorow i will take all out and clean all parts and the chassis
big step forward

Re: MG TA1932 in Germany - Blog - all problems and ...
On the stock steering bracket there are four bolts. The upper bolt holds the box to the bracket and is designed to be installed with the head of bolt facing out--opposote of what you show. If the nut loosens and falls off, the bolt will only be able to back out just about an inch before it hits bodywork--and remain captive. A key safety feature!!
That safety feature makes it necessary to remove the three bolts holding the bracket to the chassis. Those bolts also should have the head facing outward, and the nut on the inside. Those three bolts are easily accessible behind the road wheel. Remove those three bolts and raise up the bracket/box a couple inches, and then you can remove the 4th bolt holding the box to the bracket.
In review, all 4 bolt heads should be facing outward.
Pic showing bolt head of "captured" top bolt.
- IMG_1796.JPG (70.15 KiB) Viewed 5552 times
-
cdrolshagen
- Posts: 113
- Joined: Tue Dec 29, 2015 1:30 am
- Location: Soerup Germany
Re: MG TA1932 in Germany - Blog - all problems and ...
@ Duncan,
the stock steering bracket is fixed with 3 bolts and one rivet,
cheers Carl
the stock steering bracket is fixed with 3 bolts and one rivet,
cheers Carl