MG TC stage 1 Wood Frame Build

Discussion of TABC-related matters
User avatar
SteveW
Posts: 321
Joined: Sun Aug 23, 2015 8:25 am
Location: Nottingham, UK

MG TC stage 1 Wood Frame Build

Post by SteveW » Sun Sep 25, 2016 2:21 am

I've just completed stage 1 of my wood frame rebuild as defined in Mike Sherrell's book so I thought that I would report on my experience should anyone else be doing this. I'll spread this across a couple of posts as its a little involved:

First of all, I stripped the body irons back to bare metal and then painted them with POR15. I made sure that the rolling chassis was level sitting on the garage floor by placing thin bits of ply wood under the relevant wheels as my floor is not exactly flat. Next I bolted the irons to the chassis. As you can only use the front two pairs of mounting points (the rear two being through the wood frame itself - see later), I found that it was easier to position accurately by bolting a scrap of wood across the rear of the irons at the correct spacing otherwise there are too many degrees of freedom to play with. The dimensions given in TC Forever are correct for the mounting points and can be set very accurately with a bit of fiddling.

Image

I managed to recover the threaded blocks that recess into the side members of the diff cover frame which are used to hold the diff cover in place. These were also painted in POR15.

Image

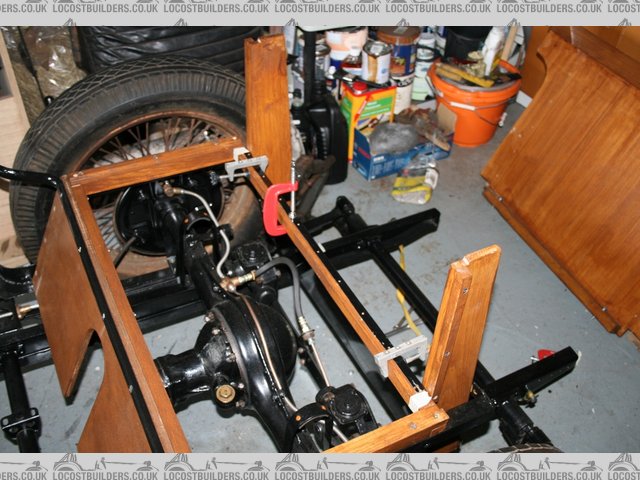
After that, I fitted the diff ramp, the diff cover frame and the bulls horn (which had been painted in POR15 like the body irons). By the way, all of the wood was liberally coated in two coats of wood preserver and then two coats of protective wood stain. I found that some of the wood needed to be trimmed here and there to get the accuracy that I was after. Interestingly, the 5 holes in the bulls horn were not in the exact places as described in TC Forever. It looks to me as though the original builders just knew that it needed 5 approximately equally spaced holes and drilled them by eye, so my advice is don't assume that every measurement in TC Forever is correct without checking against your car first.

Image

User avatar
SteveW
Posts: 321
Joined: Sun Aug 23, 2015 8:25 am
Location: Nottingham, UK

Re: MG TC stage 1 Wood Frame Build

Post by SteveW » Sun Sep 25, 2016 2:31 am

Next I set about setting up the side screen box and rear plywood board. I found it easiest to 'dry fit' everything first using loads of clamps to keep everything in place. I then put masking tape on the frame and chassis in various locations so that I could fit everything in the right places later, using these as reference marks.

Image

Once had satisfied myself that everything fitted (again, some trimming necessary), I found that the easiest way to construct was to screw the box ends to the box metal first. The observant amongst you will see that my side screen box has twice as many fixing holes in it than it should have, but I ended up using all of these so that I didn't end up with any empty fixing holes.

Image

User avatar
SteveW
Posts: 321
Joined: Sun Aug 23, 2015 8:25 am
Location: Nottingham, UK

Re: MG TC stage 1 Wood Frame Build

Post by SteveW » Sun Sep 25, 2016 2:46 am

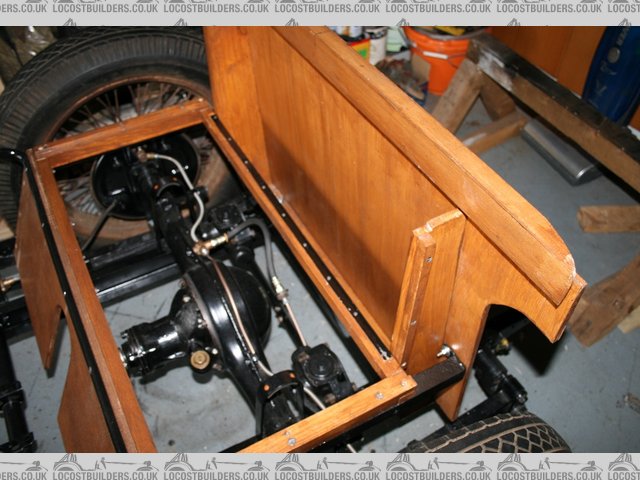
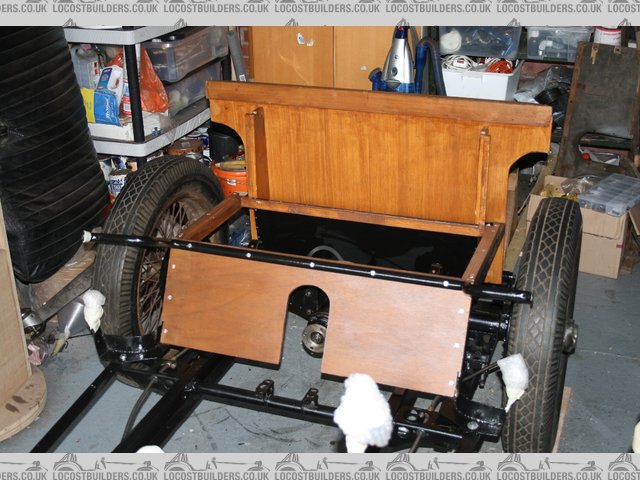
Finally, I fitted the back board and associated parts. The important thing here is to ensure that the fronts of the box sides are vertical (i.e. at right angles to the diff cover frame). This means that the back board should lean forward a little. This bolts to the chassis via the wood batten that is screwed along its bottom edge.

Rather pleasingly, with the box sides vertical, the bolts holding the back board to the frame were at exactly the distance that they should be (According to TC Forever) from the forward body iron to frame mounting points, suggesting that I had actually done it correctly.

Note that whilst I used a spirit level for rough fitting, I found that taking relative measurements in every place possible was the best way to ensure correct fit during stage 1. For example, to make sure that the diff cover frame was level with the chassis, I measured the height of it from the chassis rails in several locations, adjusting accordingly. At final fix, my largest discrepancy in any measurement was < 1/16", with most being better than that, which I'm happy with.

Note that in the following pictures, I have deliberately left the 'wings' on the back board a little too large. These need to blend into the wheel arches, so rather than risk cutting them too short now, my plan is to trim them during stage 2.

Image

Image

Stage 2 progress report in due course, although this may be a while as I am busier during the academic year than at other times.

User avatar
SteveW
Posts: 321
Joined: Sun Aug 23, 2015 8:25 am
Location: Nottingham, UK

Re: MG TC stage 1 Wood Frame Build

Post by SteveW » Sun Sep 25, 2016 2:54 am

Just before anyone points it out, the chassis is restored but the wheels are not so I know that they look bad in the pictures. My plan is to restore the wheels last, otherwise I'll just end up damaging them as I have to use the rolling chassis as the jig for the rest of the build as I don't have the space to make a separate jig for the frame.

User avatar
Steve Simmons
Site Admin
Posts: 2737
Joined: Wed Dec 26, 2012 10:48 am
Location: Southern California
Contact:

Re: MG TC stage 1 Wood Frame Build

Post by Steve Simmons » Sun Sep 25, 2016 8:37 am

Looking great! It gives me hope that when the time comes, maybe I'll actually do it myself.
1949 TC8975 / XPAG 9609
1948 TC6011 / XPEG1182 (XPAG6472)
http://www.mgnuts.com

User avatar
frenchblatter
Posts: 625
Joined: Wed Apr 01, 2015 1:22 pm
Location: Royston, South Yorkshire
Contact:

Re: MG TC stage 1 Wood Frame Build

Post by frenchblatter » Sun Sep 25, 2016 10:37 pm

I bought a complete tub from Rique Llanares. I'm useless at wood work so thought it best.
Lynne & Norman Verona.

Our website

Visit our website to see what this idiot gets up to in his retirement

User avatar
SteveW
Posts: 321
Joined: Sun Aug 23, 2015 8:25 am
Location: Nottingham, UK

Re: MG TC stage 1 Wood Frame Build

Post by SteveW » Mon Sep 26, 2016 12:59 am

frenchblatter wrote:I bought a complete tub from Rique Llanares. I'm useless at wood work so thought it best.
Before the TC I had built and then driven a low-cost seven style kit car, into which I managed to squeeze a 2.8l BMW straight 6 engine. During that process, I discovered that I enjoyed the build as much as driving it - hence the new project.

I'm reasonably proficient at woodwork around the house but this is the first time that I've tackled a wood car frame (discounting the MDF that I made the core of the kit car dash from). I'm taking building the TC frame very slowly and steadily and one of my lessons is to double whatever time that I think its going to take to do a particular stage. I am enjoying it though (please feel free to remind me of that when I start to rant about how hard it is to fit the compound curve pieces!)

By the way, if anyone is interested, the following is a link to the photo archive for my kit car build:

http://www.locostbuilders.co.uk/photos. ... %20archive

If the link doesn't work first time, just try it again as the website occasionally takes you to a donations page if you are not logged in as a member

User avatar
frenchblatter
Posts: 625
Joined: Wed Apr 01, 2015 1:22 pm
Location: Royston, South Yorkshire
Contact:

Re: MG TC stage 1 Wood Frame Build

Post by frenchblatter » Mon Sep 26, 2016 8:58 am

Steve, my rebuild of the Caterham after an accident is on my web site. www.frenchblat.com, click on "bit of daft" then "Seven" and it's on the menu as "accident rebuild".

I wanted the TC finished as quickly as possible, Having waited 60 years to get one I didn't want to spend too much time rebuilding it. I overhauled everything mechanical, fitted a new tub from Llaneres and had a local garage who specialise in renovations (mainly Citroens) repair and paint the panels. I would have finished it in 9 months if the bodyshop hadn't held it up using it as a fill in when they weren't busy. It was back on the road in 13 months.
Lynne & Norman Verona.

Our website

Visit our website to see what this idiot gets up to in his retirement

User avatar
SteveW
Posts: 321
Joined: Sun Aug 23, 2015 8:25 am
Location: Nottingham, UK

Re: MG TC stage 1 Wood Frame Build

Post by SteveW » Wed Sep 28, 2016 1:12 am

Hi Norman, I've been following your TC build with interest and the large number of photos that you took are a valuable resource for me, and I assume for others as well.

By the way, the new edition of TTT2 is just out which includes an update of my rolling chassis restoration (i.e. the stage before the wood build reported here). The link is...

http://ttypes.org/ttt2/restoration-of-tc8485-part-2

User avatar
frenchblatter
Posts: 625
Joined: Wed Apr 01, 2015 1:22 pm
Location: Royston, South Yorkshire
Contact:

Re: MG TC stage 1 Wood Frame Build

Post by frenchblatter » Wed Sep 28, 2016 11:02 pm

Steve, Thanks,. There is a technical index and I've put bookmarks in the longer process so you can jimp over the work done in between.

John (TTT2) has the final episode and should publish next month. It's a bit long so he may split it into two.

BY the way, we may be coming over to Sheffiled in the nwext few months, maybe we can meet for a beer.
Lynne & Norman Verona.

Our website

Visit our website to see what this idiot gets up to in his retirement

User avatar
SteveW
Posts: 321
Joined: Sun Aug 23, 2015 8:25 am
Location: Nottingham, UK

Re: MG TC stage 1 Wood Frame Build

Post by SteveW » Thu Sep 29, 2016 12:47 am

frenchblatter wrote:
BY the way, we may be coming over to Sheffiled in the nwext few months, maybe we can meet for a beer.
It would be good to meet up and compare notes. My daughter has just started a degree in Civil and Structural Engineering at Sheffield Uni, so I could combine meeting up with you for a beer with a visit to see her (not that its a long way from where I live anyway).

I have most of what I need for my car, but if you have any left over parts that you have acquired along the way, let me know and, if I need them we could agree a price and hand over if we get together.

User avatar
Herman 5560
Posts: 185
Joined: Thu Apr 16, 2015 3:31 am
Location: Port Elizabeth SA

Re: MG TC stage 1 Wood Frame Build

Post by Herman 5560 » Mon Apr 03, 2017 2:20 am

Steve

What is your research showing with regard to hinges for the side screen box lid?

I did a search on the forum, but nothing. :?

I carefully went through TCFE and also nothing. :?

Dirk suggested the covering fabric acts as a hinge, which makes a lot of sense, but so far no documentation to that effect.

User avatar
SteveW
Posts: 321
Joined: Sun Aug 23, 2015 8:25 am
Location: Nottingham, UK

Re: MG TC stage 1 Wood Frame Build

Post by SteveW » Tue Apr 04, 2017 4:22 am

Hi Herman,

I'm afraid that I don't know the answer either as it was missing off my car. However, this picture shows my original diff cover and it appears to show two latching points for the side screen box lid, if that helps at all.

By the way, I'm just about to send you an e-mail with a picture and a question for you. Easier to do it by e-mail than reproduce the picture to the right size on here.

Image

User avatar
frenchblatter
Posts: 625
Joined: Wed Apr 01, 2015 1:22 pm
Location: Royston, South Yorkshire
Contact:

Re: MG TC stage 1 Wood Frame Build

Post by frenchblatter » Tue Apr 04, 2017 11:12 am

My sidescreen box lid has to tags on the bottom and a strap fastner on the top. It is a tight fit so won't fall open.
Lynne & Norman Verona.

Our website

Visit our website to see what this idiot gets up to in his retirement

User avatar
jeffnewey
Posts: 21
Joined: Fri Jan 04, 2013 5:05 pm
Location: Newcastle NSW .Australia

Re: MG TC stage 1 Wood Frame Build

Post by jeffnewey » Tue Apr 04, 2017 3:26 pm

Herman..contact me with your email address and I'll send you photos, original and restored side screen area.
Jeff Newey
TC0489
Newcastle NSW
49671454

User avatar
Herman 5560
Posts: 185
Joined: Thu Apr 16, 2015 3:31 am
Location: Port Elizabeth SA

Re: MG TC stage 1 Wood Frame Build

Post by Herman 5560 » Tue Apr 04, 2017 8:59 pm

Done.

Also interested to see how the upholstery is done.

User avatar
Marv
Posts: 242
Joined: Sat Oct 03, 2015 7:34 pm

Re: MG TC stage 1 Wood Frame Build

Post by Marv » Wed Apr 05, 2017 5:36 am

@jeffynewey Why don't you post the photos and info here so we can all see your progress, tips and finished product. After all, that's what this forum is all about. Thanks.....

ian fletcher
Posts: 33
Joined: Sun Jul 21, 2013 1:31 pm
Location: Birmingham UK

Re: MG TC stage 1 Wood Frame Build

Post by ian fletcher » Wed Apr 12, 2017 2:40 pm

Hi Herman, From the Frame Up has a video showing side screen box and position of hinges. I have an original diff cover and can measure the position of screw holes for the 1 1/2" steel butt hinges. They are attached to the side screen box lid before it is covered with the material.

Cheers Ian

User avatar
Herman 5560
Posts: 185
Joined: Thu Apr 16, 2015 3:31 am
Location: Port Elizabeth SA

Re: MG TC stage 1 Wood Frame Build

Post by Herman 5560 » Wed Apr 12, 2017 8:22 pm

Thanks, brilliant video.
Pitty I did not know about the felt before I assembled everything. Would have been a lot easier than doing it now.
Sorry for hi-jacking your thread Steve.

User avatar
XPAGnut
Posts: 42
Joined: Sun Feb 12, 2017 12:41 pm

Re: MG TC stage 1 Wood Frame Build

Post by XPAGnut » Thu Apr 13, 2017 8:27 pm

Those FTFU videos are pretty good. Many more than when I checked a couple years ago

Post Reply