Petrol Cap
Petrol Cap
Something which may seem elementary to many of you has caused me to scratch my head. I wish to remove the petrol cap from my '49 TC for re chroming as the brass is showing through...but how is it fitted.? Were they brazed in or should I be able to unscrew it.?
Re: Petrol Cap
There is a pin that serves as the pivot point of the cap to the fuel tank neck assembly, Remove that and the cap assembly can be removed, Then click on the link below that Doug Pelton at FTFU has put together. He may have any parts you may need for re-assembly.
http://www.chicagolandmgclub.com/techti ... sembly.pdf
Marv
http://www.chicagolandmgclub.com/techti ... sembly.pdf
Marv
Re: Petrol Cap
Doug is a great source of parts, and his "tech tips" are full of useful info. He will not mind if I take issue with how he has assembled the cap. The "cup" just beneath the bronze nut and above the cork seal in his CR182 pic http://www.chicagolandmgclub.com/techti ... sembly.pdf appears to be upside down. In my pic the cup is the nickel colored disc. My pic is of my preservation '49 TC's cap as put together by the factory. Missing is the cork, no doubt turned to dust long ago. I drive the car often and have never seen a drop of spilled fuel, but I seldom fill the tank much above half full.
- Attachments
-
- TT_CR182_Gas_Cap_Assembly.pdf
- (104.22 KiB) Downloaded 168 times
Last edited by Duncan M on Sun Sep 29, 2019 10:44 am, edited 4 times in total.
Re: Petrol Cap
Thanks guys.
It might be of interest that I intend to fit a petrol gauge. Whilst there is nothing wrong with the low level warning light idea, I felt that a gauge would be an attractive addition and to that end I have commissioned John Marks of Vintage Restorations (England) to make one. It will match the other British Jaeger instruments that he is restoring for me.
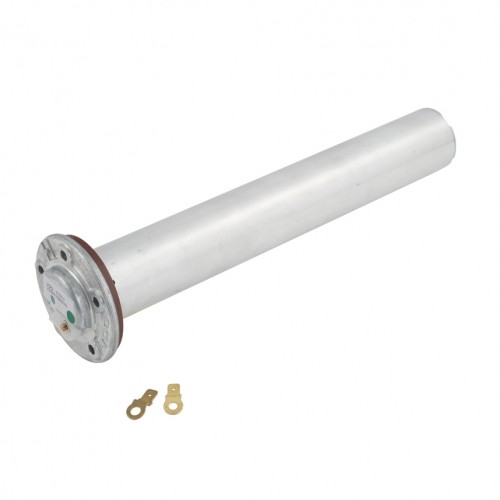
I have found a 500mm dip tube type sender unit that closely matches the required 4 - 80 ohms and it will be fitted to the opposite end of the tank to the existing filler. I intend to fettle another cap to disguise the top of the sender unit. It should look like a twin filler tank...quite sporting, I think.
Re: Petrol Cap
Ray,the YT Tourers had a petrol gauge that matches the other TC instruments!
- frenchblatter
- Posts: 625
- Joined: Wed Apr 01, 2015 1:22 pm
- Location: Royston, South Yorkshire
- Contact:
Re: Petrol Cap
Ray, I think a 1960s rheostat type tank unit will fit in the existing warning lamp unit. I've not measured it but the flange looks the same. You can then use the same wire that goes to the warning lamp to run the gauge.
Lynne & Norman Verona.
Our website
Visit our website to see what this idiot gets up to in his retirement
Our website
Visit our website to see what this idiot gets up to in his retirement
Re: Petrol Cap
Yes, that is what John Marks makes. As he owns the trade mark it will be a matching green British Jaeger gauge.jeffnewey wrote:Ray,the YT Tourers had a petrol gauge that matches the other TC instruments!
I am also having a matching "boost" gauge with vacuum reading to go with the Eaton M45 supercharger. I spoke with Steve Baker today and he hopes have it ready by the end of next week. We have been waiting on the carb. I have opted for a 1 3/4" SU.
Re: Petrol Cap
Hello Vernon. I have bought a 500mm dip tube type sender unit which has a 75.4/ 4 ohm range which is pretty close to the 80/4 ohm of the gauge. John Marks says he can "tweak" the gauge to make certain that the needle comes to rest on it's peg.frenchblatter wrote:Ray, I think a 1960s rheostat type tank unit will fit in the existing warning lamp unit. I've not measured it but the flange looks the same. You can then use the same wire that goes to the warning lamp to run the gauge.
One thing that I was worried about was if the sender unit would have any solid state components that might be polarity sensitive. The reason why this was a concern was that the fitting instructions only show a negative earth and my car is positive earth. Fortunately, a check with the suppliers ( ETB instruments of Southend on Sea) confirmed that it is safe for me to swap over the wires for + earth.

The reason for a dip tube type sender unit is that any other floating arm type would not work in the tank because of the vertical baffles. The existing unit has a short float arm that only operates at the bottom of the tank. I fully intend keeping the low level warning light in addition to the gauge.
