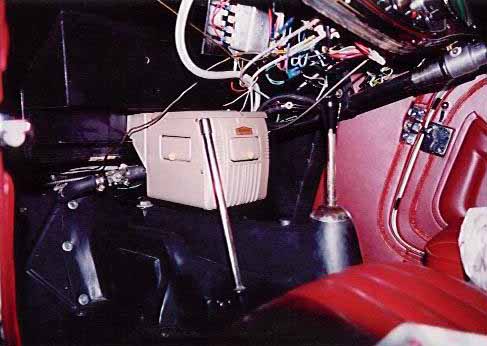
One (tcheater, I think should show up as the file name) is a wide angle closeup of the heater unit inside of the cockpit, clearly a '40's design with the slightly rounded front and vertical bars in the casting. The small knobs on the vent doors are ivory/yellow plastic like the 40's accessory knobs like radio volume controls, etc. You can see the inlet water hose with an inline valve (heavy wire on/off control arm is horizontal in the photo). I haven't actually hooked up a cable to it yet because it is easy to reach, even from the driver's seat with a little bit of leaning over (not too safe at highway speeds, I guess). I still have to make a bracket for the pull knob that I'll eventually attach under the steering column, probably; it will also be the mounting point for the original lighted rheostat switch for the fan,too.

You can also see the side of the bracket (triangular side view, rectangular top and back), that is attached to the underside of the tool box. I had to trim a little of the corner of the bracket to shorten it to fit the width of the tool box. This bracket had come with the heater and is attached to the heater box with 2 fixed bolts that are welded/force fit to the back of the heater case, for either a "hanging" mount as I have done from the bottom of the tool box, or a back mount (removing the bracket entirely and directly mounting the heater vertically directly to a firewall). I (and the fellow helping me with the construction details like some welding) welded 2 nuts to the underside of the top of the bracket to create captive nuts. When the bracket and heater is mounted as a single unit to the toolbox, I didn't have to hold the nuts from below as well as turn the bolt from the top. Just line up the holes in the tool box with the captive nuts ( requiring a helper from below, but no coordination of the nut and bolt by hand) made the job much easier. Plus, if I ever have to remove the heater/ bracket, it should be easier too.
The one place that I had minor clearance problems and had to measure carefully was with the emergency brake handle that is a tad too close to the heater's left side. If I'm not careful it might catch a finger. The alternative was to crowd the driver's legs a bit too much. There's still plenty of room on both sides for passenger and driver where I've sited the heater.
I've seen one or two of these "Hadees" heaters in a TC and a Y, but mine is the only one with the original label identifying the manufacturer/brand. The fan motor appears to be a fairly substantial unit and is mounted in rubber bushings -- really quiet and vibration free. I rewired the connecting wire and replaced the brushes, but didn't have to touch the armature windings, etc. Pretty good volume for an early heater.

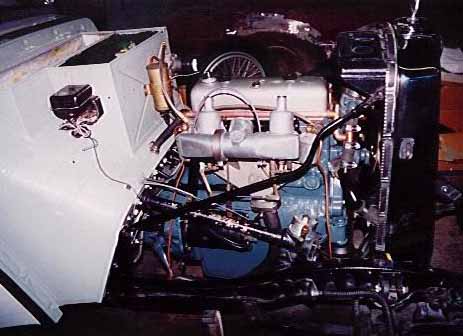
The second photo is of the right hand side of the engine bay showing the return plumbing from the firewall, across the top of the head next to the rocker cover to a 90 degree angle downwards into the 1" rubber "down pipe" -- look for the bleeder valve at the 90 degree corner. I was looking for a T with bleeder, which is what I had seen in a Hal Kramer's TD (won "Best in the World" at a GOF a few years back -- but I won't mention that new fangled model T in the TABC list ! HA!). However the local Home Depot store had bleeders for a corner and it's quite unobtrusive. This photo was taken before I had painted the copper piping black to match the rubber pipe,but I think it shows up better here for the construction details. You can also see that I've opted for the original blue/gray block color for early TC's, as well as the firewall color that is a light green-gray. That's another bit of the research and fun that I had with this part of the restoration (--came from John Twist's shop that was restoring a TC with original paint on the engine and scuttle -- they sent me a paint sample mixed from their computer match of some less aged paint under some accessories).

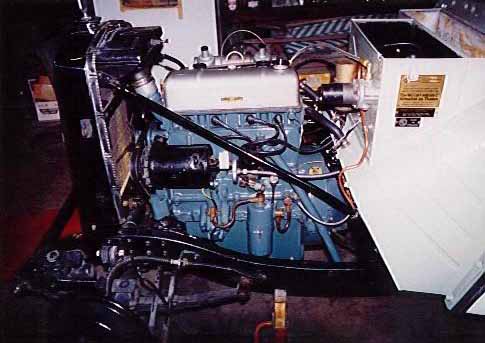
I've got one more photo of the left side of the engine for the input side to the heater, but it's much less plumbing, with the takeoff from the back of the head into the scuttle -- about 6-8" of heater hose, connecting to the firewall and then into the hose and valve in the heater photo mentioned above. Also I can send one photo of the side view of TC3944 after returning home with restored front wings and much of the body filler removed from all of the wings, a job that I knew had to be done when I bought it in the early '90's. I had to find someone who could reshape the front fenders correctly. It helped that I had a TC friend with original fenders that I could borrow (his is in pieces for his 2nd restoration -- he previously had done it in '73 or so). That little horseshoe shaped piece of metal in the tip of the front fenders is nearly magic when it comes to holding the correct shape!
Enough rambling for now. If you want me to send the other 2 photos, assuming you've seen these first, let me know.
Best regards
Art King